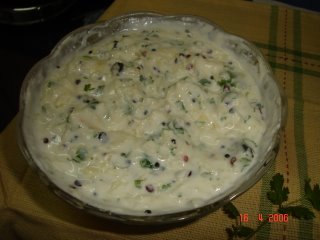
Monday, May 01, 2006 

Raw Mango Raita


Raw Mango or Kairee/Kayree as we call it, is abundant in the summer months. The king of fruits, the mango is flooding the markets here in Bangalore. Its been about a month since the raw ones have been around and I still haven't got down to trying out as many new recipes I can using this... as its just going to be here for a couple of months more. There's so much that one can do - pickles, chutneys, raitas, cool drinks, dals, rice....will I be able to try out different varieties in each before the raw ones disappear giving way to the golden yellow fleshy juicy ones - which I have to mention, become a part of all my meals - to be had with breakfast, lunch, dinner or as a snack in between!

Just the other day I came across a file of mine with clippings of all sorts - mainly recipes from magazines and newspapers - cut out and stored away meant to be tried one day...now that my blog is up, I'm going to try them out soon and post them if they turn out well :)

Armed with raw mangoes and the cutting of a recipe for raw mango raita, I ventured into the kitchen with full josh :). The recipe is from 'The Hindu' and though the paper cutting I have has no date, I think it dates back to 2002. Why I remember it is because that was the year I got married and had started collecting recipes from here and there - recipes which looked simple and do-able!

Here it goes...RAW MANGO RAITA

Fresh curd - 300gm
Raw mango - 1 medium size

Cooking oil - 1 tsp
Mustard seeds - 1/4 tsp
Urad dal - 1/2 tsp
Whole Red Chilly - 1
Sugar - 2 tsp
Salt to taste

Peel and grate the raw mango. Sprinkle 1/4 tsp salt over it. Leave it for a few minutes for the water to run out. Using your palms squeeze out the excess water from the grated mango .

Tie the curd in a muslin cloth so that excess water drains out and you get thick yoghurt.

Add sugar, salt and raw mango. Mix well.

Take oil in a small frying pan. Add whole red chillies, urad dal and mustard seeds. Allow them to splutter.

Add it to the above curd mixture. Garnish with coriander leaves and serve.

I must tell you that the raita was just yummy!!! Will definitely make it a few more times while the raw mangoes are around. Though the recipe in the newspaper calls it a 'Raita', but I think I would rather label it as a Raw Mango Dip. Raitas, in my opinion are a bit watery and since the recipe above uses 'hung' curd, it is more thickish and ideal to be served as a dip.

Since this Raw Mango Dip turned out to be so good, it is going to be my entry to Indira's "Jihva For Ingredients" food blog event for May. It's definietly worth a try - not only because it is nutritious (Raw Mangoes loaded with Vitamin C - teamed up with the ever-so-healhty Curd make a deadly combination) and easy to rustle up but because its going to stir the taste buds so much that one will be left for craving for more! At least, I was!

Monday, April 17, 2006 

The Same Old Aloo Gajar Sabji.....

Sunday dinner was again uninteresting - plain Aloo Gajar Sabji with Rotis and Curd. My brother, who lives with me, did give me some strange looks though - without commenting. But I knew what those looks meant - can we have a break from a roti-sabji meal please? Two such meals in a row and that too on a Sunday...see how adjusting I am!!

Anyways...this is what I did...

Heated 1 tsp of Oil in a non stick pan.

Added a pinch of Asafoetida (Heeng) and 1/2 tsp Cumin seeds (Jeera) till seeds are golden brown.

Added 2 Carrots and 1 Potato ( cubed), increased the flame to high and stirred for 2-3 minutes.

Reduced the flame and added in around 1 tsp of grated Ginger, 1/4 tsp Turmeric Powder, Salt to taste and just a dash of Pepper.

Let the whole thing heat through, covered with a lid, reduced heat and let it simmer for 8–10 minutes. Opened the lid a couple of times to stir it. This will cook the veggies till they are tender but firm.

Next, I sprinkled 1 tsp Coriander Powder, 1/2 tsp Mango Powder (Aamchoor) and 1/2 tsp Garam Masala.

To add a bit more taste to this uninviting Sabji, I added around 2 tsp Ghee to it. The water would have dried up by now and the vegtebale will look glossy. Fried it for 3–5 minutes, stirring once or twice. This final roasting in ghee brings out a different flavour.

Garnished with fresh coriander and served the Sabji with Rotis.

(One can add in Peas as well..I didn't have any...Peas will add more to the colourful look of this Sabji!)


Shimla Mirch Paneer - With A Difference!

Sunday meals are usually elaborate and rich. Not for me, yesterday, at least. Yesterday I had hardly any time to cook. I was busy. Busy in what? On MISSION ORAD! ORAD? 'One Room A Day'!! I am in a cleaning mode presently - and not just cleaning, but detailed cleaning! It was the bedroom yesterday - started with straightening out the almirahs, changing the paper on the shelves, the cobwebs, washing windows, polishing furniture, the fan, the switchboards, the light fittings, the door, taking off the curtains and washing, polishing the woodwork, making the mirror shine till my hands ached, scrubbing the tiles on the floor, washing Tanisha's toys - THE ENTIRE WORKS! Though the target had been one room in a day but that room took me two days - doing all of that does take time!

So, with a satisfied smile on my face as I glowed in the feeling that one room is done, I set out preparing lunch which was very simple - Rotis with Shimla Mirch Paneer Sabji. The Sabji tuned out to be good but ended with a couple of burnt rotis though...CULPRIT? Thoughts of which room to target next and listing out the order in which the above cycle would be repeated were going on in the background!!

Shimla Mirch And Paneer - With A Difference

I've made the normal Capsicum with Paneer Sabji many times and was looking out to trying something different. The recipe below is more or less the same but its got Besan (Gram Flour) added to it which makes it taste a bit different!

Cut 2 Capsicums ( Shimla Mirch), 100 gms Paneer (Cottage Cheese), 1 Onion into medium sized chunks.

Heat 2-3 tbps Oil in a thick bottomed pan and add 1/2 tsp Red Chilly Powder to it. Saute the Onions in this seasoned Oil.

Add 1/4 tsp Tumeric Powder and 1 tsp Garlic Paste to it after the Onions have browned a bit.

Wait for a minute and then add 1 1/2 tsp Garam Masala and stir it for another minute.

Add 2 tbsp Dahi (Yoghurt) to it slowly bit by bit and keep stirring it.

After the masala looks well blended add the Shimla Mirch pieces and cook for 5-7 minutes till it becomes a bit soft.

Sprinkle around 2 tbsp Besan ( Gram Flour) and keep stirring it otherwise it may start sticking to the pan.

Next, its time to add 1 chopped tomato and wait for around 3 - 4 minutes till it becomes mushy.

Add the Paneer cubes, Salt to taste and 1-2 slit Green Chillies.

Mix the whole thing well, and keep it on the fire for 3-4 minutes more and garnish with chopped coriander leaves.

The Sabji tasted good with Rotis (not the burnt ones!)...the Besan adding that 'different' flavour to it.

Wednesday, April 12, 2006 

Pudina (Mint) Paneer

Its been quite a few days that I have't posted anything...not that I haven't cooked..but just that I haven't been able to get around to posting whatever I cooked! Is something wrong with my time management or does it happen to anyone who has a 18 month old toddler??!! Its so diffiult finding some 'ME' time..and at times like these I think I made a good decision to take a break from a full time job....otherwise trying to be a super perfectionist that I always want to be - juggling domestic chores, cooking, a job, a baby plus the other 101 things-to-do that I somehow manage to invent for myself would have surely taken its toll on me!

I almost always have "Paneer" in my refrigerator as Tanisha (the 18 month old in discussion above!) loves having it plain. And when I had just some 15 miutes on hand to dish up dinner, and no stock of any other vegetable except for some tomatoes, I quickly turned to Nita Mehta's "More Paneer" recipe book for help!

And this is what I made - Pudina (Mint) Paneer!!(I had some dried Pudina stored away in a box as well and had totally forgotten about it until I came across this recipe) Very simple..and easy..

Take 2 Tomatoes and cut them into 4 big pieces. Remove the pulp and chop it into tiny pieces. Keep the pulp aside.

Take 200-250 gms Paneer and cut into 1/2" cubes.

Heat 2-3 tbsp Oil and add 2 Onions, sliced very finely, to it. Cook till it is light brown. Add 1/4 tsp Turmeric Powder, 1/2 tsp Red Chilli Powder and Salt to taste. Cook for around 1/2 a minute more.

Add the tomato pulp and cook for another 2 minutes till it dries up.

Next add the Paneer, 1/2 bunch freshly chopped Pudina (Mint Leaves) or 1/4 cup dried Pudina, and the chopped tomato pieces.

Add 3/4 tsp Garam Masala, cook for 2 more minutes and remove from fire.
Done!


Saturday, April 08, 2006 

Sooji (Semolina) Ka Halwa


Search for 'Sooji Ka Halwa' on Google and it throws up hundreds and hundreds of recipes..all are basically the same, just playing around with the measures of Sooji, Water and Sugar and the types of nuts that one can add to it! I've added my notes and learnings in brackets with each step. Though I've made it quite a few times, but I decided to do my homework and research properly once again and then go about making this Halwa!

Heat around 3 tbsp Ghee in a kadhai and fry the nuts that you are going to add to the Halwa. I used around 10 Raisins, 10 Almonds slivered, 10 Cashswenuts cut into halves. One can avoid roasting the nuts in ghee and just add it later, but frying them does make the Halwa taste good :). So, one can indulge occasionally. Take them out and reserve them to be used later.

Mix, 1 cup Sugar, 2 cups Milk, 2 cups of Water with 4 Chotti Illaichi (skinned and crushed and bring to a boil. Keep aside. (The proportion of water and sugar is equally critical. Sooji:Sugar:Water ratio is usually 1:1:2. However, Nita Mehta's Everyday Cooking cookbook states that the liquid should be four times that of Sooji and that too, half of it should be milk and half water. So, I decided to follow her version and see how the Halwa turns out to be. What I observed was that the Halwa was a more gooey mass with 4 cups of Milk-Water, in comparison to the usual 2 cups of water and the addition of Milk also lightened the colour of the Halwa...it should have looked a li'l more browner! This was the first time that I used milk along with water to make this Halwa. Usually, its just water. Even the sugar proportion can be reduced - use half a cup if you want to enjoy a guilt-free treat of this Halwa, or increase it to 3/4th of a cup, though it tastes best with 1 cup!)

Heat 1/2 Cup of Ghee in the same kadhai and then add 1 cup Sooji to it. Roast it on low heat till it just changes colour.(This is the most important step in making this Halwa - this is what can 'make or break' this delicious Halwa. Each time I've tried my hand at making this, I've achieved a different colour for the final product - dark brown to golden-ish to sandy brown! I guess something in between is ideal - if it is undercooked then the rawness of the Sooji remains and if it becomes too dark, it is overcooked and doesn't taste great. As they say, practice makes a man perfect! When will I become perfect???!! The proportion of Sooji:Ghee is ideally 4:3 but then again once can vary it to as low as 4:1 - I adopted the middle path of 2:1!)

The rest is just simple - putting together of everything. Add the milk mixture, fried nuts to the roasted Sooji and stir on low heat continuously making sure that no limps are fomred, till it leaves the sides of the kadhai. Mould them into any shape and serve decorated with some nuts.


Sookhe Kaale Chane - Ashtami Waale!


Soak 1 cup Kaale Chane (Black Chick Pea) overnight in water. Wash it thoroughly the next morning and pressure cook/boil them till cooked. They should not be mashed and still retain their shape.

Heat 1 tbsp of Mustard Oil in a kadhai. Add 1 tsp Jeera(Cumin) to it. Wait till it turns golden. Add the Kaale Chane and discard the water. Add 1 1/2 tsp Kala Namak, 1 tsp Bhoona Jeera (Jeera - dry roasted and powdered), 1/4 tsp Red Chilli Powder.

Mix all the ingredients together and keep it on the fire for 1-2 minutes more. Take it off the fire and add 2tsp Lemon Juice to taste. Simple!!


Kaddu Ki Poori (Red Pumpkin Poori)


Kaddu - Pumpkin
Poori - Deep Fried Indian Bread


Usually, people tend to make plain flour Pooris on Ashtami, but I had some 'Kaddu'(Baby Yellow Pumpkin) left over from the day before and I remembered from somehwere that one can make Pooris out of this vegetable as well. Google "Mata" Ki Jai Ho! I came across a couple of recipes for Pumpkin Poori and they were basically very similar and very simple....so, I started right away.

Whole wheat flour, 2 Cups
Pumpkin, boiled, skinned and then mashed, 1 Cup
Jaggery/Brown Sugar, 2 Tablespoons
Cardamom powder, 1/4 Teaspoon
Oil for frying

Mix all the ingredients and form into a dough. Roll the dough out somewhat thicker than a plain poori. And fry in oil just as you would the normal Poori. The measures of the ingredients are as per what the website suggested from where I got this recipe but I added a bit more crushed Jaggery than what was suggested. There is a mild sweetness in this Poori and the Pumpkin makes it a bit more yellowish/orangish in colour plus they are very very soft! Another thing - the recipe asked the Poori to be rolled out thicker than a normal one - wonder why??

Even though Pumpkin has a Halloween connection to it but these delicious looking and simple to make Pooris are not evil at all!! (The idea of having to deep fry them and consuming those extra calories is what is evil but I'm sure we can roll them out into Rotis as well - without frying. Will try them next when I have Kaddu in my refrigerator!)


NavRatri - The Festival Of Nine Nights


Yesterday (7th April, 2006) was Ram Navami. Navratri basically means "Nine Nights" ("Nav" meaning nine and "Ratri" meaning nights). It is a prominent Hindu festival and devoted to Goddess Durga. Navratras, are celebrated twice in a year. The first one observed in April-May (Chaitra month) end with Ram Navami and the second in September-October (Ashwani month) end with Dussehra. Incidentally, these two periods mark the beginning of summer and winter seasons. Sri Ram is worshipped during the first Navratras whereas Maa Durga in the second Navratras.

" Durga Pooja" celebrated with much fervour in the state of West Bengal and the Gujrati Garba/Dandiya are associated with the Ashwani Navratras. The March/April period celebration of the Chaitra Navratras are somewhat toned down and on a smaller scale.

Back in North India ( where I hail from), the Navratras during the summer is associated with a period of fasting for 7 days. The devotees break their fast on the eight day or Ashtami. Since childhood I've seen my grandma and my mum calling little girls - called Kanjaks to our house on this day. These young girls are symbolic of the Goddesses that they had been worshipping in the past 7 days. Their feet are washed, worshipped and are then offered the traditional "Poori, Halwa and Kaala Chana" and are usually given some token money along with some small knickknack like bangles, red chunnis etc. I still remember when as children we were made to feel so important and we had "appointments" to visit this Aunty's place at so and so time and that Aunty's place at that time for this traditional custom :). The ninth day Navami ends this period and is celebrated as Ram Navami.

We've been thinking for quite some time to visit the shrine of Mata Vaishno Devi in J&K but our plans don't seem to materialise. It is the busiest during these two times of the year - during Navratras. Lets see when we cam make the trip :)

I've stopped fasting since a couple of years but do try to make the traditional fare of "Poori, Halwa and Kaala Chana" on Ashtami if I can. And as I was running around in the kitchen this time, I got all nostalgic....I remember when in hostel, how we used to religiously keep fasts and observe the Navratras. The 'religious' angle was involved but I guess it was more of a way to detox our bodies! Nine days of fasting, living on just juices, fruits, salads etc, yoghurt - it worked wonders on our system and we usually ended up feeling good about ourselves at the end of it!! Those were some days.....

So, it was Kaddu Ki Poori, Sookhe Kale Chane and Sooji Ka Halwa for breakfast on Ashtami this year for us. It's a lovely combination - Halwa, Poori and Chane - and can be had as a weekend breakfast too!!


These dishes can be made in a jiffy and its not that their recipes are very elaborate and I can do away with having to detail them out here - but no! I shall still go ahead and do it...after all I'm keeping a tab on what I cooked through this blog!

Wednesday, April 05, 2006 

Meetha Paratha - A Quick Breakfast!


When you have dough leftover from last night and barely have time on hand to make an elaborate breakfast, here is a Paratha which comes to the rescue! Not only is it quick to make but enjoyed by children as well.

- Take 2 cups of Atta (Wheat Flour) and knead it to a smooth dough with enough water. Leave aside covered for half an hour.

- Roll up balls out of the dough while the Griddle heats up on the gas stove.

- Roll out each ball. Spread some Ghee on the Paratha and sprinkle about 2 tsp Sugar ( Or Gur (Jaggery)) and a big pinch of Saunf (Aniseed) on the rolled Paratha. Make a slit from the edge till the centre and roll to form a cone. Press the cone from the top and roll out again to a slightly thick Paratha.

- Cook the Paratha on one side till brown specs appear, then, flip, and cook on the other side till brown specs appear again. Apply ghee on the first side, flip and apply ghee on the second side. And it's done....!

My notes:

As a variation, 1 tsp of grated coconut can be added with the sugar and saunf. It imparts a 'richer' taste to the Paratha!

The Parathas need to be rolled out thick. If rolled out too thin, it starts sticking to the Griddle ( Due to the melting and caramelising of sugar). Not only that, thick Parathas give that extra bite/crunch and bring out the taste of the stuffing.

Once the Parathas are transferred to the Griddle, poking holes over it with a fork or making slits with a knife on it allow the ghee/oil to be absorbed inside, making the Paranthas crispy.

Instead of using the 'cone method' to make the Paratha, one can simply roll out a small round first - thinner on the edges and thick in the middle. Mould it like a cup, add the filling, seal it again by pulling over all the edges, make it into a ball and roll it out again.

Another method to make Meetha Paratha is to knead the flour with some salt, baking soda, ghee and sugar dissolved in warm milk. Make balls, roll them out and fry them on the Griddle. This method doesn't give the best results for me always as the dough tends to become sticky and difficult to roll out at times.

Its best to have these Parathas hot. Once they turn cold, the melted sugar inside hardens and even microwave-ing the Paratha to reheat will not yield the original taste!


Sunday, April 02, 2006 

Kaale Chane Rasse Waale with Brown Jeera Rice


Kaale Chane Rasse Waale


Translated to English, this would mean Bengal Gram Curry! Packed with Iron and Proteins, this is a very healthy and nutritious curry and teams up very well with Brown Jeera Rice (Recipe below).


1. For the gravy: 2 tomatoes, 1 big onion, 6-8 glakes of garlic, 1" piece ginger

2. 1 cup of Kaale Chane soaked overnight in water, 3 tbsp oil

3. Whole Spices: 2 Laung(Cloves), 2 Moti Illaichi(Black Cardamom), 2-3 Dalchini sticks(Cinamon)

4. Powdered Spices: 1/4tsp Turmeric, 1tsp Salt, 1/2 tsp Red Chilli Powder, 1 tsp Coriander Powder, 1/2 tsp Garam Masala, 1tsp Chana Masala, 1/2 tsp Amchoor(Dry Mango Powder), 1/4 tsp Black Pepper Powder

5. 1 tbsp Kasoori Methi

- The Black Chanas soaked overnight in water need to be drained and washed well and then pressure cooked with around 4 cups of water and 1 tsp of salt. They take quite a while to become soft..around 4 whistles on the pressure cooker and then keeping it on low flame for another 15-20 minutes should do it.

- The ingredients as listed in 1. need to be made into a paste in the mixer.

- Now, for the actual part...I heated the oil in the pressure cooker itself(the boiled Chanas with the liquid were emptied into another pan). I went on to add the whole spices listed out in 3. Waited for a minute and then added the paste to it and stir fried it for around 10 minutes till is became dry and golden brown-reddish in colour.

- Next its time to reduce the heat and add in all the powdered masalas in 4. after which the whole thing needs to be stirred for a couple of minutes more. I took out a 3-4 tbsps of the boiled chanas, mashed it and added it to the paste so that it becomes thick, rather than adding the chanas and then going about mashing some of them! Right, so we stir it for a minute more so that the mashed Chanas blend in with the paste. Adding around 1 tbsp Kasoori Methi leaves, rubbed between fingers and crushed finely, at this stage imparts a good flavour to the curry.

- Next I added the remaining Kaala Chanas reserving the water aside. After 3-4 minutes of stir frying it, I added the reserved water to it, closed the pressure cooker lid and let it cook till another whistle.(This was to enure that that the gravy gets absorbed into the chanas well!)

Garam garam Rassedaar Kaale Chane...taiyaar(ready)!!!

My homework on Kale Chane/Channa

This hard and dark brown gram with a thick husk is also know as Bengal Gram, Black Gram, Black chick-pea. What confuses me as to why is it called black chick pea because the gram is brown and not black! Moreover, we usually refer to the Sabut Urad Dal as Black Gram. So, if anyone could tell me about it, it'll be helpful.

This is the gram from which chana dal and besan (chickpea flour) are made.

Shyamala of "Food In the Main", whose blog I follow, has a somewhat similar recipe for this dish - Kaala Chana Curry. Have to try out her method soon to see if it tastes different from this. Comparing notes from how she made it and the way I went about it, I had doubts like: She uses blanched tomatoes - does that make the dish taste different, used finely chopped onion and tomatoes and didn't make them into a paste like I did - does it matter, pressure cooked the whole spices with the Chanas itself than sauteing them in oil - will that make a difference? , Added just the Chana masala unlike me who added so many spices, she omitted garlic and added cumin and green chillies. See that's where I get lost...though her recipe is quite similar, but it has subtle differences. I hope my restless mind will be put to ease soon if I get answers for these queries!

Other dishes that can be made with Kale Chane are: tossed in with some salad, dry version like the one made as a prasad on Ashtami, Kebabs & Tikkis, Sanjeev Kapoor's Rajasthani version of it, made with Coconut Milk like Keralites do, the Bihari version - Ghoomni, The Bengali style - Ghughni (Though Ghughni can also be made with dried white peas, white chick peas, peas etc) and even Kaale Chane Parathas! Wow...that's a lot! There I go! I started off with one curry recipe for Kaale Chane and here we have so many other ways to have have this healthy chana! Have to try them all....soon!

Brown Jeera Rice

1. 1 cup rice, 2 cups water, 2 small onions sliced finely

2. 1tbsp sugar, 3 tbsp water

3. 3 tbsp Ghee, 1 tsp Salt or to taste

4. 1" stick Dalchini(Cinamon), 1 Tej Patta(Bay Leaves), 3-4 Laung(Cloves), 1 Choti Illaichi(Green Cardamom), 3-4 Sabut Kaali Mirch(Peppercorns), 1 tsp Jeera(Cumin seeds)

- Initial Step: The rice must not be soaked. I washed the rice well and then strained it keeping it in the strainer for 30 minutes.

- For The Brown colour: I mixed sugar and water in a heavy bottomed wide kadhai. It needs to be cooked on low flame till it is rich brown in colour. Next, I reduced the heat and add the 2 cups of water to it and stirred till it dissolved. I removed it from fire and kept the brown sugar water aside in a separate pan.

- The Actual Part: I heated the ghee in the same kadhai and added all the sabut whole spices (No. 4 on the ingredient list) ending with the Jeera. When it turned golden, I added in the sliced onions and stir fried it on medium heat till it was rich brown in colour (but not burnt!). Then it was time to add the rice and folded it in gently for 1-2 minutes. Then added the brown sugar water and salt. Brought the whole thing to boil, covered the kadhai with a well fitting lid (so that the steam didn'tescape) and cooked it on a very low flame till all the water got absorbed and the rice turned soft. Fluffed it up with a fork and served.

There you go...Kale Channe Rasse Walle with Brown Jeera Rice...my first blogged meal!!!

Saturday, April 01, 2006 

Yet Another Indian Food Blog!


Why Am I Blogging?

At last... my food blog is up and running! I have been thinking of having one for many months but just couldn't get around to doing it. I'm really feeling important writing this post, gives me the feeling as if a veteran cook is writing the preface/introduction to her soon-to-be-published cook book :)!!!

There are so many recipes to try out and cook. Even if I set a target of trying out one a day, how long will it take before I have that feeling - Yes, I've tried out everything possible?! Never I guess...as cooking is also a creative art - slight variations can result in some amazing tastes!

The endless food websites, blogs, books continue to amaze me. I am no expert cook myself (that's what I think) but I definitely intend to become one some day. I want to try out everything. I guess this blogging phenomenon has embraced me quite late and there are hundreds of blogs around on Indian cooking…this blog is an attempt to document all of what I dished out, so that I myself can keep track of what I did and I haven't – a log book to keep me accountable for my culinary adventures! Hence, Memoirs From My Kitchen….

My culinary adventures started only after I got married 3 and a half years back. Within that frame I would have cooked say for around a year and a half. That's it.

Now, that I have time on hand, I want to utilize this time to the best and have that "self gratifying" feeling of being able to cook well. Another reason, I have a year and a half old baby - when she grows up, I don't want her to say that her mom wasn't a good cook (Now that’s not funny!). My husband who works for the merchant navy sails on ship for most part of the year and is not around with us. A food lover with a good appetite, it is for his love of food too that I am going to start this blog. Use the time when he is not here to try out recipes, master them to perfection and turn out one palatable meal after the other when he is here and get loads of compliments!

This sudden interest on what happens in the kitchen has evolved quite late and hence this urge to find out background information on everything - the why, how, what and when. I hope this blog turns out to be an interactive one where guidance/suggestions/answers from those who love to cook and stop by at my blog would clear the 101 questions and doubts I always get when I cook!

Even though I might have cooked a particular dish a few times, but I still tend to refer back to the recipe in case I haven't missed out on anything! And I'm never sure if it will turn out to be the same, bad or better than the last time! I guess the day when I'm able to rustle up a meal without having to refer to a recipe - that will be the D-day! ‘C’mon”, my mum would say, “ there is just one basic method to make gravy items and one basic way to make dry sabjis.” Not to my opinion, when I browse through recipes on the web or through books and magazines - why then, are there so many variations, differences in the order of putting the ingredients, different recipes and methods of making gravy and dry items? It sure does make life for a 'learner' like me complicated!!

Born a Punjabi, having lived for most part of my life in West Bengal, having pursued my studies from Bangalore and Mumbai and now back to living in Bangalore, married to a Bihari….I’m sure that there will be shades of various state cuisines in my culinary experiences!

No...I don't loathe cooking, but I guess I am just not quite efficient in the kitchen and tend to fumble, bumble around. I hope that my journey through this blog will surely turn out a competent and confident cook – Shilpi at the end of it!

Thanks for stopping by and taking sparing a few moments to read. Hope to see you around again!

Noteworthy: I must acknowledge and say thanks to my friend
SN, who ‘christened’ my blog!